Colour B4 Hair Colour Remover Extra Strength – My thoughts!

So… Not too long ago I was really bored with the colour of my hair. My hair is naturally a darkish auburn colour, but I have always wanted to be more “ginger”. I lust love it! When I was little my hair was literally bright orange, but as I got older it darkened quite a bit. I don’t dislike my natural hair colour, and I admit that I sometimes dye it a lighter shade of auburn, but I just get fed up of the same old colour all the time. So on a random trip to Tesco I picked up some hair dye which was a lovely colour. Think Florence Welch – just like that. I looked on the back and matched my hair colour to the swatches on the packaging which show the shade your hair is likely to turn out and was happy with it (I just wish I could remember which one it was!). I did my skin test, then dyed my hair. Oh. My. Gosh. I rinsed it out and blow dyed it, and my hair was literally bright red. Not orange red – dark pillarbox red. In a fit of panic, as I couldn’t go to work with my hair that colour, I dyed it again a darker colour. This went massively wrong so I had to dye it again and it turned out almost black and I HATED it. I put up with it for a little while, but when I couldn’t bear it anymore I took the plunge and bought the Colour B4 Hair Colour Remover in the extra strength formulation which is for longer or more intensely coloured hair.

colourb4

I read loads of reviews before I bought it, and with the assistance of my mum, the process of removing 3 lots of dye in one go began. The instructions are super easy to follow, but you have to follow them to the letter for it to work properly – if you don’t the results will not be anywhere near as good/disastrous. This product works by shrinking the colour molecules so you can wash them out of your hair, so they have to reach a certain size before they can be rinsed out. If you don’t leave it on for long enough or don’t rinse for long enough the colour could come back as it was before, or worse, really patchy (as my friend discovered – HAHA! That’s twice I have rescued your hair from disaster 😉 ). You apply the mix to dry hair, mixing part A and B and applying it all through your hair (be sure not to miss any!). You then have to wait 30 minutes for the regular one, or an hour for the extra strength, in a room that is warm with no drafts and with cling film wrapped around your head. You won’t look particularly amazing during this stage, but the warmth helps to accelerate the removal of the colour. When the time is up, you have to rinse your hair continuously for 5 minutes if you have short hair or 10 minutes if you have long hair. As you are rinsing you need to run your fingers through your hair as this helps the molecules to be washed away. When you have rinsed your hair for long enough, you have to apply half of the bottle labelled part C which is the buffer. You leave this on your hair for 1 minute, then rinse again for another 5 minutes at least. After this, apply the last of the part C, lather as you would with a normal shampoo and rinse till it is all gone. And that’s it! Just dry your hair to see the final results, as wet hair tends to look darker.

This stuff changed my hair from almost jet black to strawberry blonde. I have never been blonde a day in my life, so I was really shocked to see myself with lighter hair than I have ever had before. This was because when I had dyed my hair lighter auburn before dying it red, it stripped it to its lightest stage. I have to say – after the initial shock – I really liked it! It was a massive improvement from the black which made me look really unwell. Over time it did tone down a bit to a very light browny auburn, and as my roots came through I used a semi permanent light brown to blend my hair a bit. It has since darkened quite a bit and blends quite well without any hair dye.

Pros

It got rid of my god awful black hair! Black does not suit me AT ALL.

It’s relatively cheap (I think its £9.99 for the regular and £11.99 for the extra strength one in Superdrug – much cheaper than having it done at the salon)

It didn’t damage my hair as much as I thought it would. My hair was in a pretty sorry state to begin with after being colour treated 3 times in as many days, and it did leave quite dry and tangled, but after using a whole tub of a macadamia hair mask in a week, it was lovely and soft again.

Cons

I had read online that it smelled bad. Bad doesn’t even come close. This stuff smells like burnt hair and rotten eggs, and my hair is really bad for smells. I could smell this in my hair for, no word of a lie, 4 WEEKS. It made me so self conscious, and whenever I washed my hair the smell got worse until it dried. YUCK.

I don’t think this would be good for people with super damaged or waaaay over processed hair. I watched a video on YouTube of a girl who had dyed and bleached their very short hair repeatedly for many years and it was so damaged but decided to use this. She ended up having to shave her head. So if your hair is really, really damaged like hers I would steer well clear.

You have to use SO MUCH WATER. My shower died half way through all the rinsing which is why I think my hair got a bit darker after a few days. That was slightly stressful!

So there you go, my thoughts, opinions and experiences of the Colour B4 Hair Colour Remover. Would I buy this again? No. My lessons have been learned, and I am now trying to grow my hair out completely. When all the stripped hair has grown out (still got a way to go – my hair is about 6 inches past shoulder length and my roots are down to my ears – sigh. If anyone has any tips for helping hair grow faster PLEASE let me know in the comments below!), and it is at the length I want it (about 6 inches longer than it is now) I am thinking I might go ombre 🙂 Not bright blonde, more of a coppery blonde. At least that way if I don’t like it I can just cut my hair! Ah well, you live and you learn!

Makeup Bag Maintenance – The Essentials!

A bit more of an informative post for you today (and quite a long one too – sorry!), as my last one was more of just a fun one! My makeup bag is super important to me, so I try to take good care of it. There are a few simple things you can do to keep your make up at its best, so here are my top tips for makeup maintenance.

The most basic thing to keep on top of is your makeup bag (if you have one!). If the bag itself is dirty, then the likelihood is the contents are too. If the bag can go through the washing machine, wash it regularly. If it can be wiped clean, make sure you get in to all the nooks and crannies. Cant do either? Get a new one when it gets dirty. An unclean makeup bag is likely to be full of dirt, makeup residue and bacteria. Why would you want to put that on your face when it can lead to or worsen breakouts? If you store your makeup in drawers, keep those clean too. Either line the drawer with paper and replace it frequently, or invest in some little plastic trays that you can use to line the drawers that can be taken out and washed easily. Super simple, but so often overlooked.

A good set of brushes can last you years if they are taken care of. Keep them in a brush roll, or upright in a container like a pen pot to keep the bristles from becoming worn and damaged over time. Keeping them clean is also really important. You can get specially designed brush cleaner, or what I tend to do is use Johnsons Baby Shampoo. Its cheap, and does a great job of getting all your makeup off the bristles without leaving a residue or making them stiff. Just get a little bit on your hand, dampen the brush and swirl it about. Its amazing how much makeup one small brush can hold! Make sure you rinse thoroughly, and repeat if necessary. To dry, squeeze out as much water as you can then leave them somewhere to dry naturally. Don’t put them on a towel to dry, as it doesn’t do them much good. It is best to leave them on a window ledge or something similar with the brush hanging over the edge. This allows the air to get all the way round, and the bristles aren’t sitting on a damp surface. You should clean your brushes regularly, depending on how often you use them and how much makeup you use – I tend to clean mine every 1-2 weeks as I use my brushes every day and my foundation I am using at the moment is quite heavy. This keeps them at their best and build up and bacteria to a minimum. Even brushes that very rarely get used should be cleaned regularly.

I don’t really use powder puffs and sponges that often as I don’t think they are the most hygienic way to apply makeup, but if I am on the go or travelling and need to pack light they are a great alternative to taking a big roll of brushes. I tend to opt for disposable ones, which you can wash a few times and then throw away, but there are higher quality ones that can be washed and reused many times before they should be replaced. As a general rule I store these items separately – with my powder puff I don’t keep it in a compact, I keep it in a little ziplock bag. Call me over the top, but I don’t really want to use a powder puff on my face, then put that potentially dirty/germy puff in with my makeup. I keep sponges in a ziplock bag too, as it is best not to have them floating around in your makeup bag picking up all the dirt before using it on your face. Potential breakout zone right there! Eyelash curlers are another makeup tool that often goes forgotten – the rubber pads are easy to clean and curlers often come with a spare pair. I clean the curlers themselves with hot soapy water and a toothbrush to get any makeup out of the grooves where the pads sit. I think it really important to keep these clean as you use them near your eyes, and using something dirty near them is never advisable!

Pallettes are something else that you can easily keep clean with a damp cotton bud. You can go around the packaging and get rid of any makeup that has smudged, or any that has been picked up in your makeup bag. This stops any cross contamination, and it also keeps them looking nice!

Makeup has an expiry date, and when it goes over this date it is best to get rid of it/replace it. This is a rough guideline of when different things are likely to expire:

Mascara- 6 months (but can dry out much sooner depending on formulation or amount of use)

Eyeshadow- 2 years

Eyeliner- 2 years

Foundation- 2 years

Powder- 2 years

Concealer- 2 years

Powder/cream blush- 2 years

Lip liner- 1 year +

Lipstick- 1 year +

So as you can see, most makeup lasts a good amount of time, but a lot of people I have spoken to didn’t know that makeup had an expiry date at all! It is better to keep on top of things and replace bits as you go rather than end up doing a massive overhaul of your makeup which could be quite an expensive shopping trip! Makeup that has become dirty or damaged should be replaced, even if it is way off the expiry date.

So there you go! I hope this post has been useful for you! If you want to see more posts like this, or if there is something you would like to see then let me know! I am finally going to start using Twitter (you can find me here – @LoLiFaBeauty) and Tumblr (you can find me here – youcancallmebea1), so you can pop me a tweet etc. if you have any good ideas! My instagram username is the same as it is here (youcancallmebea), and as I love photography I thought it might be nice to share a few if my snaps with you on there too!

June Favourites!

As this is my first monthly favourites post, its a bit of a cheat. Most of these are things that I have used for a long time because I love them! There are a few new favourites, but next month will be a little less of a cop out. So here we go! Here are the things that I have loved for the past month (or longer – I will add a * before the ones I have used for a while!):

June Favourites

*Primark Oil Balancing Face Wipes – I love these because they are super cheap (£1 for 2 packs), they don’t break me out, and are great for if you want to get your makeup off or just refresh your skin. They don’t get every last bit of makeup off, but they do get most of it off and then I go over my face with a cleanser to get the rest off. Great for lazy days!

*Bio-Oil – I have some quite bad scarring on my leg and hand from an accident had. I have used Bio-Oil for a long time now, and it has made a world of difference to my scarring. It is now barely noticeable on my leg, and my hand is much better, but I find I always end up washing it off which is why I think it’s taking a little longer to fade.

*Carmex – The best lip balm ever. I have been through several tubes and pot of this in a variety of flavours, and will continue to purchase this for a very long time! It smells lovely, is super moisturising, and makes your lips tingle when you start using it (I’ve used it for years, so it doesn’t tingle so much any more). I carry one of these with me at all times! At the moment I have the original flavour in the pot and the tube, the lime one in a twist up tube, and I have a cherry one somewhere (which is my least favourite of all of them, but  still really like it!).

Badger Balm Cuticle Care – I have already reviewed this product separately, I absolutely love it!

Barry M Gelly Nail Polish – The formulation for these is incredible. I am terrible with nail polish, usually it is chipped like crazy within a day or 2, but this  can have on my nails for over a week and only have slight wear at the ends with no big chips out of it. I will definitely be investing in more of these, as I only have 2 colours at the moment (13 – Papaya, and 12 – Greenberry) and I can see them running out very soon!

CK One Shock Street Edition  Perfume – There is not much I don’t love about this. The bottle is beautiful, the fragrance is gorgeous (as I’m rubbish at describing scents, this is what I found online as the description: Top notes open with glittery citruses (bergamot and mandarin) combined with sweet plum zest. The heart incorporates sweet, intense fruity notes sweetened with dark chocolate and caramel, while the base is soft and warmed with aromas of patchouli, sandalwood, amber and musk), and it lasts a really long time. It has quickly become one of my go to fragrances! I just wish it had a lid to use when you use the atomiser rather than the screw on lid. It makes it a bit awkward for travel, but I might just get a new Travalo so I can have it with me all the time!

*John Frieda Frizz-Ease 3 Day Straight Spray – I use this whenever I know I am going to straighten my hair, you just spray a bit in to damp hair, blow dry it then straighten away. My hair is naturally a curly mess, and this stuff really does help keep your hair straighter for longer. I give my hair a little touch up in the mornings and I’m good to go! Saves having to completely re straighten it every day and damage it more and more.

*Dove Maximum Protection Anti-Perspirant Deodorant – A bit of a random one, but it is literally the best anti perspirant I have ever used. Shan’t go into too much detail on that one, but it’s amazing! If you have an issue with excessive sweating (I don’t, but I hate any kind of feeling sweaty so anything to help avoid it is welcome in my life) then I would definitely recommend this.

*Soap & Glory Breakfast Scrub/Scrub Your Nose In It/Smoothie Star – I have combined these 3 as I have already reviewed them separately so I thought it was best to go on too much! I think these really are fab!

I won’t list too many things for this one, as it really does feel like I’m cheating a bit! But I have recently bought some new products to try, so there will be a bit more of an interesting post next month, promise!

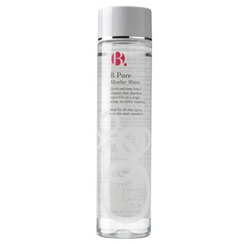
B.Pure Micellar Water

I have wanted to try a micellar water for a long time. I liked the idea of just wetting a cotton pad with it, holding it on my eyes for a few seconds, and my eye make up just sweeping off super easily. I wasn’t so inspired by some of the price tags that follow with it though! I wasn’t willing to spend lots of moolah on a product I wasn’t sure would work as well as I had heard, as I tend to use mostly waterproof mascara etc. So when I saw this in Superdrug on offer, I thought I would give it a go! It is the B. Pure Micellar Water (150ml).

548853_l

It usually retails at £4.99, but it was 1/3 off so I paid £3.32 for it. The smell reminds me of the really cheap bubbles you used to get in party bags as a kid… It is quite a faint smell, and it doesn’t linger on your skin so it’s not bad at all. I used it with the Boots Baby Extra Large Cotton Pads (they are amazing, so much easier to use on your face than the little round ones), and I have to say it was amazing at getting off my make up! I found that you do have to use a fair bit to get all of your make up off if you are wearing a lot, but for a day to day face it is great! This might be a little different if you use one of the more ‘high end’ micellar products. You don’t have to scrub at your eyes to get that stubborn mascara off, so no pulling out eyelashes. Unfortunately for me, that is where the love affair for this product ends. The packaging states that you do not have to rinse your face after you use this, but I find if I don’t it leaves me feeling quite slimy, and if I use it before I go to bed, in the morning my face just feels disgusting. It doesn’t sting your eyes, but it doesn’t taste great either so I wouldn’t lick your lips if you get some on there! Also, I am now having quite a bad breakout, and this is the only part of my routine that I have changed recently so I’m guessing it’s down to this. Boo! So disappointed, I really, really want to love this but I just can’t. It will probably suit other peoples skin much better, it just isn’t for me. So overall, for a £3.32 trial run on a new product, I am impressed with its make up removing abilities for the price it is, but I won’t be repurchasing this particular micellar water again. I am tempted to try one of the bigger brands, like Taaj or Bioderma to see if it is any better, but we shall see!

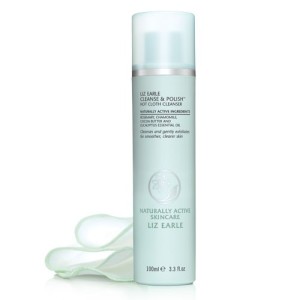
Liz Earle Cleanse and Polish

The last thing I want to do if I have worn heavy eye make up is to spend 20 minutes scrubbing away trying to get it off. Pulling out my eyelashes and giving myself sore eyes is not my cup of tea! Which is the main reason I decided to give this product a try. I had heard many a review saying it was amazing and gets eye make up off really easily, which ticks a big box for me! So off I went to my local John Lewis which has a big Liz Earle counter, and picked up the Cleanse and Polish starter kit. You get a 100ml tube of the cleanser, 2 muslin cloths and it comes in a handy little bag for £14.95. I don’t think this is too bad a price for what you get. There are much more cost-effective ways of buying this, but as I wasn’t sure I would get on with this I didn’t want to spend too much. There are some quite bad reviews of this product, and some people have had quite a bad reaction to it, but it’s like everything in the world – it’s not for everyone. People will react differently for different things! So you just have to try it yourself and see.

cleanse-and-polish-100ml-pump-starter-kit-lrg

Instructions for use (this is how I use it):

1- Rub 1-2 pumps of the cleanser all over your face without wetting it, even with a full face of make up. Pay particular attention to the eye area if you have worn a lot of eyeliner/mascara/eye shadow etc.

2- Wet the muslin cloth with warm/hot water, and wipe off the cleanser, buffing the skin in little circles as you go.

3- You may need to rinse the cloth if you have had a lot of make up on, or even apply more of the cleanser, but this is fine to do.

4- You should have a lovely clean, refreshed and make up free face!

The first time I used it I was absolutely blown away by how easily it removed my waterproof mascara! It took a few goes to get used to the idea of rubbing a cream in to my eyes, but it doesn’t sting or anything like that (it sometimes makes my eyes a bit blurry, but that goes away when I wipe my face). You do look pretty scary with big panda eyes, but it is so worth it. I cleanse the rest of my face and do my eyes last, otherwise you end up with mascara/eyeliner etc. all over your face. I don’t think it would make any difference, I’m pretty sure you’d get it all off just as easily, but I’m a bit funny like that! I could not believe just how much make up came off onto the cloth when I first tried this – it removes every last bit from your face. Some cleansers (like Clearasil) dry out my face so much, but this doesn’t dry me out at all! My skin feels really soft after using this, and any little dry bits of skin are gently buffed away with the cloth. I actually discovered that the cloth is great on sunburnt, peeling (but not sore!) skin – I’m not suggesting you should use the cleanser if you have sunburn though! But I wore quite a bit of make up to cover up my peely face, and used the cleanse and polish to get it off. All my yucky peely bits are gone now! I don’t think you’re meant to use it on damaged skin but hey… Oops ^^ I would never use it on newly burnt skin. My face felt a lot less itchy/stretched, so can’t really complain. So well done Liz Earle! I would quite like to try some more Liz Earle products, maybe even the make up… But not really sure. A little research might be in order now! If you have any suggestions then please let me know!

Cuticle crisis!

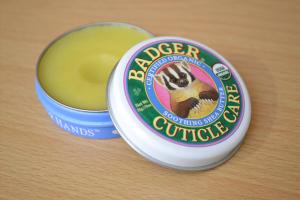
Regardless of the season, I always seem to have dry, cracked cuticles. Whilst browsing through Feel Unique I stumbled across Badger Balm’s Cuticle Care (excuse the rubbish photo – my camera didn’t want to play nice!):Badger Balm Cuticle Care

I had heard of this brand before and seen many good reviews of the range online, so decided to buy one of the mini tins just to give it a try. The smell is lovely. Its a bit lemony, with a hint of something else but I’m not sure what! It soaks in quickly, and within a week of using this I have seen a marked improvement in the look and feel of my cuticles. They’re still not perfect, but they were quite bad! With time I can imagine that this will continue to work wonders for me. On the back of the tin it says “treat your nails and cuticles kindly with our restorative and bodacious balm. Delicate pearls of shea naturally rise to the surface”. It just sounds lovely! When you dip your finger in it, it turns into an oil, then when you come back to it later you really can see the little beads of shea butter on top! In short, I absolutely love this. I got the mini tin (£3.99 on Feel Unique), and even though I can see this lasting a really long time, I wish I had bought the full size one! This has quickly become a staple in my daily routines, and can’t see it going anywhere anytime soon!